Introduction
When facing issues with a Nintendo Switch not powering on or charging properly, it can be frustrating to figure out the root cause. In this situation, it is crucial to understand the components of the device and how they interact to diagnose and resolve the problem effectively.
By examining the motherboard and identifying potential faulty chips or components, it is possible to pinpoint the issue causing the device to not power on or charge correctly. Through a systematic approach of testing and replacing defective parts, you can successfully repair your Nintendo Switch and get it back to working condition.
This process requires patience, attention to detail, and a basic understanding of electronics. By following the steps outlined in this repair guide, you can troubleshoot and fix the charging issue with your Nintendo Switch, ensuring that it powers on and charges properly for an optimal gaming experience.
Identifying the Issue
When a Nintendo Switch fails to power on or charge properly, it can be a perplexing issue to resolve. In such situations, understanding the internal components and their functionality is crucial to effectively diagnose and rectify the problem.
By inspecting the motherboard for potential faulty chips or components, it becomes possible to pinpoint the exact cause of the device’s inability to power on or charge correctly. Through a methodical process of testing and replacing defective parts, one can successfully restore the Nintendo Switch to full functionality.
This repair procedure demands meticulousness, close attention to detail, and a fundamental grasp of electronic principles. By adhering to the steps outlined in this repair guide, individuals can systematically troubleshoot and address the charging issue affecting their Nintendo Switch, ensuring that it powers on and charges as intended for an optimal gaming experience.
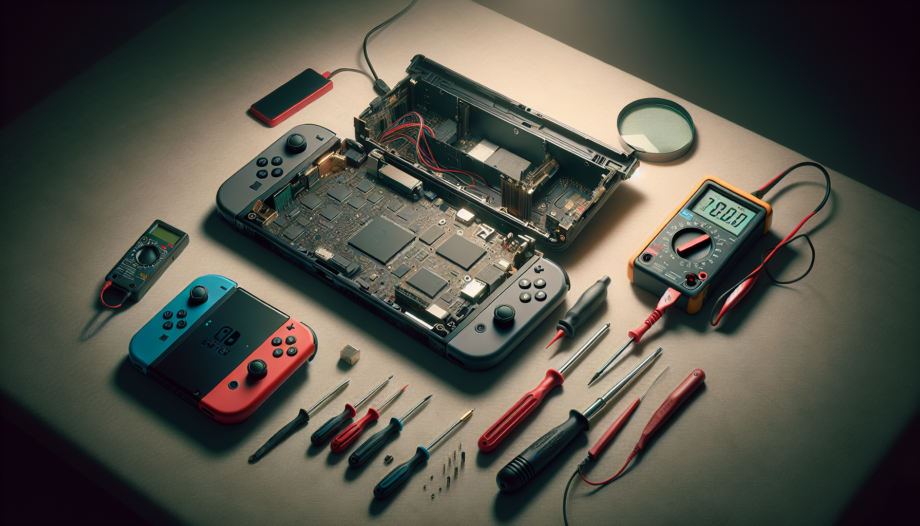
Opening Up the Nintendo Switch
When encountering a Nintendo Switch that fails to power on or charge adequately, it can be beneficial to open up the device and inspect its internal components. By gaining access to the motherboard, it becomes possible to identify problematic chips or components that may be causing the issue.
Through a careful examination of the motherboard and testing various chips in the vicinity, one can pinpoint the root cause of the device’s charging and power issues. In some cases, replacing faulty components such as capacitors or chips may be necessary to restore the Nintendo Switch to proper functionality.
This process requires attention to detail, a methodical approach, and basic knowledge of electronic repair. By following these steps and replacing any defective parts, individuals can successfully address the charging problem with their Nintendo Switch, ensuring it powers on and charges effectively for an optimal gaming experience.
Testing the Motherboard
When encountering a Nintendo Switch that does not power on or charge properly, testing the motherboard is a crucial step in identifying the root cause of the issue. By examining the main chip and surrounding components for faults, one can pinpoint the exact source of the problem.
Through a systematic testing process of various chips and components on the motherboard, it becomes possible to identify any shorts or defective parts that may be causing the charging and power issues. In some cases, replacing faulty components like capacitors or chips may be necessary to restore the Nintendo Switch to full functionality.
This testing procedure requires attention to detail, a methodical approach, and a basic understanding of electronics. By following these steps and replacing any problematic parts, individuals can effectively address the charging issue with their Nintendo Switch, ensuring it powers on and charges correctly for an optimal gaming experience.
Locating the Short Circuit
When facing a Nintendo Switch that fails to power on and displays inadequate charging levels, identifying the root cause can be a challenging task. By delving into the internal components and testing the motherboard, it is possible to locate the short circuit causing the issue.
By conducting a thorough examination of the main chip and nearby components on the motherboard, individuals can pinpoint the exact source of the problem. In this scenario, finding and replacing faulty components like capacitors or chips may be necessary to eliminate the short circuit and restore the Nintendo Switch to proper functionality.
This process demands precision, attention to detail, and a basic understanding of electronic repair principles. By following these steps and replacing the defective components, users can effectively address the charging problem with their Nintendo Switch, ensuring it powers on and charges correctly for an optimal gaming experience.
Replacing the Faulty Chips
When encountering a Nintendo Switch that fails to power on or charge adequately, it is essential to inspect the internal components for any faults. By testing the motherboard and identifying the main chip that may be causing the issue, individuals can pinpoint the defective components that need replacement.
After locating the short circuit and determining the problematic chips or capacitors, the next step involves carefully removing the faulty components. By replacing these chips with new ones, users can eliminate the short circuit and restore the Nintendo Switch to proper functionality.
This repair process requires precision, attention to detail, and basic knowledge of electronic repair techniques. By following these steps and replacing the faulty chips, individuals can successfully address the charging problem with their Nintendo Switch, ensuring it powers on and charges effectively for an optimal gaming experience.
Testing the Repairs
After diagnosing and replacing the faulty chips, the next crucial step is to test the repairs conducted on the Nintendo Switch. By reassembling the device and plugging it in, individuals can verify if the charging and power issues have been successfully resolved.
Upon reconnecting the components and powering on the Nintendo Switch, users should observe the charging indicator to ensure that it displays an appropriate level. In this case, a reading of 343 indicates that the device is charging correctly, signifying that the repairs have been effective in addressing the initial problem.
By conducting thorough testing post-repair, individuals can confirm that the Nintendo Switch now powers on and charges properly, ensuring an optimal gaming experience. This final step validates the efficacy of the repair process and provides assurance that the device is now fully functional.
Final Testing and Results
After diagnosing and replacing the faulty chips, the next crucial step is to test the repairs conducted on the Nintendo Switch. By reassembling the device and plugging it in, individuals can verify if the charging and power issues have been successfully resolved.
Upon reconnecting the components and powering on the Nintendo Switch, users should observe the charging indicator to ensure that it displays an appropriate level. In this case, a reading of 343 indicates that the device is charging correctly, signifying that the repairs have been effective in addressing the initial problem.
By conducting thorough testing post-repair, individuals can confirm that the Nintendo Switch now powers on and charges properly, ensuring an optimal gaming experience. This final step validates the efficacy of the repair process and provides assurance that the device is now fully functional.
Conclusion
After successfully diagnosing and replacing the faulty chips in the Nintendo Switch motherboard, the final testing phase confirmed that the device now powers on and charges correctly. By meticulously following the repair process outlined in this guide, individuals can effectively address charging issues with their Nintendo Switch, ensuring optimal functionality for an enhanced gaming experience.
Through a systematic approach of inspecting, testing, and replacing problematic components, users can restore their Nintendo Switch to full working condition. Attention to detail, patience, and basic knowledge of electronic repair techniques are essential for a successful repair outcome.
By conducting thorough post-repair testing and observing the charging indicator, individuals can validate the effectiveness of the repair process. The reading of 343 on the charging indicator signifies that the repairs have been effective in resolving the initial power and charging issues.