Introduction
Learn the detailed step-by-step process of repairing a PlayStation 5 HDMI port with this comprehensive guide. Follow along as each step is carefully explained and demonstrated to help you understand the repair process. From disassembling the console to retrofitting a new HDMI port, this guide covers it all.
Discover the tools needed for the repair, including a specialized toolkit, and learn how to handle each component with precision. Explore the intricacies of working with liquid metal and thermal compound, and gain valuable insights into troubleshooting common issues with HDMI ports.
Whether you’re a beginner looking to learn the basics of console repair or an experienced technician seeking advanced tips and techniques, this guide offers valuable information to help you successfully repair a PlayStation 5 HDMI port.
Initial Assessment of PlayStation 5
After thoroughly examining the PlayStation 5 for repair, it was evident that the HDMI port was significantly damaged due to a drop. The initial inspection revealed a flawed HDMI port that required immediate attention.
Utilizing a specialized toolkit, the technician proceeded to disassemble the console by removing the bottom cover and various screws. The process involved delicately handling the components and navigating through the intricate design of the PlayStation 5.
Upon reaching the HDMI port, it was clear that a retrofitting process was necessary. The technician meticulously modified a PlayStation 4 Pro HDMI port to fit the PlayStation 5, ensuring a precise alignment for successful soldering. This process involved using a dremel tool to adjust the port to the required specifications.
After soldering the modified HDMI port onto the motherboard and addressing any additional issues, such as areas lacking liquid metal application, the technician reassembled the console. The final step involved testing the repaired PlayStation 5 to ensure proper functionality and display output, signaling the completion of the repair process.
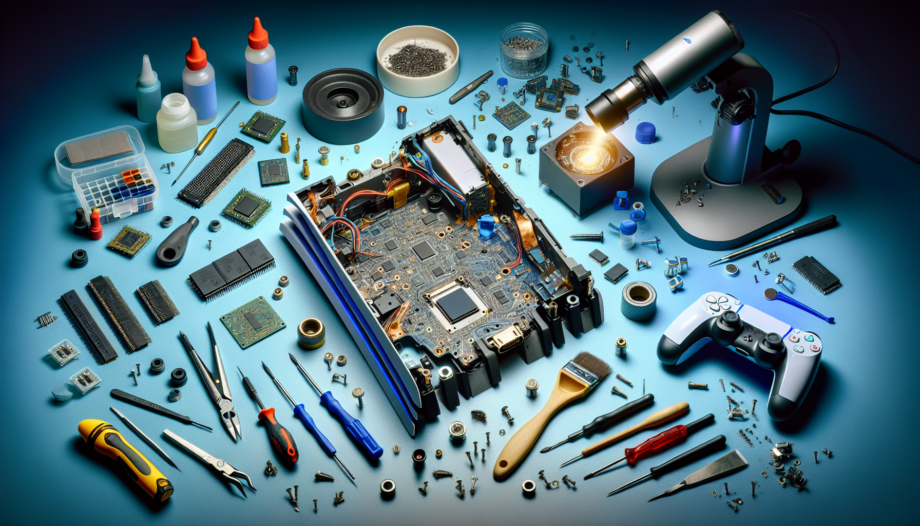
Tools Required for Repair
Repairing a PlayStation 5 HDMI port requires a specialized toolkit with various screwdriver sizes, including torx nines for precise screw removal. A flathead screwdriver and a dremel tool are essential for disassembling and modifying components. Additionally, having flux for soldering and thermal compound for heat dissipation is crucial for successful repairs.
When retrofitting a PlayStation 4 Pro HDMI port to fit the PlayStation 5, a meticulous approach is needed. Using a microscope for alignment and inspection can aid in ensuring accurate placement of the modified port. Proper handling tools like tweezers and a spatula are essential for delicate work on micro components.
Understanding soldering techniques, flux application, and thermal paste management is key to a successful repair. While a microscope can assist beginners in intricate work, experienced technicians can rely on their expertise to navigate the repair process effectively without the need for magnification tools.
Disassembling the PlayStation 5
In this detailed repair video, the technician begins by disassembling the PlayStation 5 using a specialized toolkit that includes various screwdriver sizes and tools like a dremel tool for component modification. The technician carefully removes the bottom cover and disassembles the console, navigating through the intricate design of the PlayStation 5 with precision.
Upon reaching the damaged HDMI port, the technician retrofits a PlayStation 4 Pro HDMI port to fit the PlayStation 5, ensuring a precise alignment for successful soldering. This process involves delicately adjusting the port using a dremel tool to meet the required specifications for the repair.
After soldering the modified HDMI port onto the motherboard, addressing any areas lacking liquid metal application, and reassembling the console, the technician completes the repair process. Testing the repaired PlayStation 5 ensures proper functionality and display output, showcasing the successful completion of the repair.
Removing Components Safely
When disassembling a device for repair, it is crucial to handle the components with care to avoid causing further damage. Using the appropriate tools, such as screwdrivers of the correct size and a dremel tool for component modification, can help make the process smoother.
Remember to remove screws systematically, keeping track of their placement to ensure easy reassembly. When dealing with delicate components like ribbon cables, use caution and employ a gentle wiggling motion to avoid breakage. Taking your time during disassembly can prevent unnecessary mishaps.
Additionally, when retrofitting components like an HDMI port to fit a different device, precision is key. Using a microscope for alignment and inspection can aid in ensuring accurate placement of modified parts. Proper handling tools like tweezers and a spatula are essential for delicate work on micro components.
Identifying Issues with Liquid Metal Application
During the repair process, the technician encountered an issue with the application of liquid metal on the motherboard. Upon closer inspection, it was discovered that there was an area on the motherboard that seemed to lack any liquid metal application. This raised concerns about the effectiveness of the thermal management in that specific area.
Proper application of liquid metal is crucial for efficient heat dissipation and thermal conductivity. Any areas lacking this application can lead to thermal issues and potentially impact the overall performance of the repaired device. It is essential to ensure uniform coverage of liquid metal to maintain optimal thermal performance.
While the technician addressed this issue by reapplying liquid metal to the affected area, it serves as a reminder of the importance of thorough and consistent application of thermal compounds during electronic repairs. Monitoring the application of liquid metal throughout the repair process is key to preventing potential thermal problems and ensuring the longevity of the repaired device.
By identifying and addressing issues with liquid metal application promptly, technicians can enhance the overall effectiveness of the thermal management system in electronic devices, leading to improved performance and reliability.
Retrofitting and Modifying the HDMI Port
When repairing a damaged PlayStation 5 HDMI port, retrofitting a modified HDMI port becomes essential for successful repair. The process involves taking a HDMI port from another device, such as a PlayStation 4 Pro, and modifying it to fit the PlayStation 5 motherboard. This meticulous process ensures precise alignment for soldering, requiring the use of a dremel tool to adjust the port to meet the specifications.
By carefully filing down the legs of the HDMI port and ensuring it sits correctly on the board, technicians can achieve a proper alignment for soldering. This approach of pin-to-pad soldering offers a more efficient method compared to individually tracing each pin, saving time and effort during the repair process. Once the modified HDMI port is securely soldered onto the motherboard, any areas lacking liquid metal application should be addressed to optimize thermal performance.
After completing the modification and soldering process, technicians can reassemble the console and conduct thorough testing to verify proper functionality and display output. While the use of a microscope can aid beginners in intricate work, experienced technicians can rely on their expertise to navigate the repair process effectively without the need for magnification tools. By following this retrofitting and modifying approach, technicians can successfully repair a damaged PlayStation 5 HDMI port.
Soldering the Modified HDMI Port
After retrofitting and modifying the HDMI port from a PlayStation 4 Pro to fit the PlayStation 5 motherboard, the technician proceeded to solder the port onto the motherboard. Using precision and expertise, the technician aligned the modified port with the motherboard, ensuring a secure and accurate connection.
By carefully soldering the modified HDMI port onto the motherboard, the technician ensured a reliable and stable connection for optimal performance. Any areas lacking liquid metal application were addressed to guarantee efficient heat dissipation and thermal conductivity.
Once the soldering process was complete, the technician reassembled the console and conducted thorough testing to verify the proper functionality and display output of the repaired PlayStation 5. This meticulous approach to soldering the modified HDMI port ensures a successful repair and enhances the overall performance of the console.
Testing and Conclusion
After completing the detailed repair of the PlayStation 5 HDMI port, the technician proceeded to test the console for functionality. The initial assessment revealed a significantly damaged HDMI port due to a drop, prompting immediate attention and repair. Utilizing a specialized toolkit, the technician disassembled the console with precision and retrofit a modified HDMI port from a PlayStation 4 Pro to fit the PlayStation 5 motherboard.
Through meticulous soldering and addressing any areas lacking liquid metal application, the technician successfully repaired the HDMI port. Testing the repaired PlayStation 5 ensured proper functionality and display output, confirming the completion of the repair process. The retrofitting and modifying approach employed during the repair showcased the technician’s expertise and attention to detail.
The repair process highlighted the importance of handling components with care, utilizing appropriate tools, and understanding soldering techniques for successful repairs. By identifying and addressing issues with liquid metal application promptly, technicians can optimize thermal performance and ensure the longevity of electronic devices.
Overall, the comprehensive repair guide provided valuable insights into repairing a damaged PlayStation 5 HDMI port, catering to both beginners and experienced technicians. By following the step-by-step instructions and utilizing the necessary tools, individuals can successfully repair electronic devices and enhance their repair skills.